SettingsKit
SettingsKit is a small library & build tool that makes it easier to work
with app preferences in the iOS Settings app. It also makes working with
settings a bit safer by using enums instead of magic
strings, which are
vulnerable to typos.
How does it work?
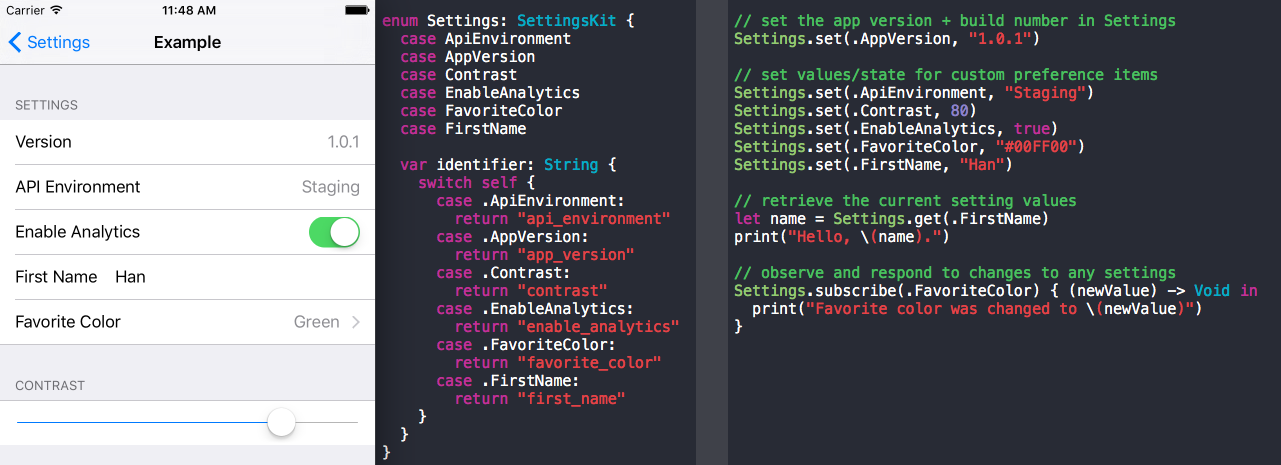
SettingsKit comes bundled with a tool that generates an enum (Settings.swift)
at build-time based on the preference items you have configured in your Settings.bundle.
You can then use the Settings enum to easily access, update and observe individual
settings.
Here is a Settings screen w/ generated enum and sample implementation code:
When would I want to use SettingKit?
Here are just a few ways you could use SettingsKit;
- display the current app version & build number to users or testers, which can
be very helpful for handling bug reports.
- give users simple controls for app preferences (e.g. enable a color blindness theme)
- enable testers to see which back-end environment (i.e. Staging
) the current
build is using, and also allow them to change the back-end environment at runtime,
without having to provide seperate builds for each environment.
The types of settings you use are completely up to you. SettingsKit simply
makes it easier to add settings to your app.
Usage
Fetch a setting
let name = Settings.get(.FirstName)
Modify a setting
Settings.set(.ApiEnvironment, "Staging")
Settings.set(.Contrast, 80)
Settings.set(.EnableAnalytics, true)
Observe a setting
// observe and respond to any changes made to a given setting
Settings.subscribe(.FavoriteColor) { (newValue) -> Void in
  print("Favorite color was changed to \(newValue)")
}
Installation
SettingsKit is available through CocoaPods. To install
it, simply add the following line to your Podfile:
pod "SettingsKit"
You will also need the xcodeproj ruby gem in order to use the SettingsKit
build tool to auto-generate the Settings.swift file.
$ gem install xcodeproj
Setup
Create a Settings bundle
In order to add custom items to Settings your app must have a Settings bundle
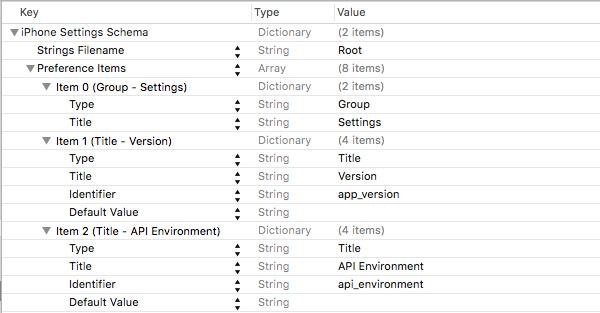
with a Root.plist. To fetch, update, and/or observe settings you will need to
add the settings you would like to use to the Preference Items
array in your
Settings.bundle/Root.plist.
Example:
Once you have added one or more preference items, build your project to have
SettingsKit generate a Settings.swift file from your Settings.bundle/Root.plist.
Important — Anytime you change the preference items in your
Root.plistyou will need build your project to generate an updatedSettings.swiftfile.
Add a run script build phase
To allow SettingsKit to auto-generate a Settings enum file you will need to
add a run script build phase to your app’s target: Target > Build Phases > +
> New Run Script Phase
IMPORTANT Make sure you put the new run script phase above the Compile Sources
phase.
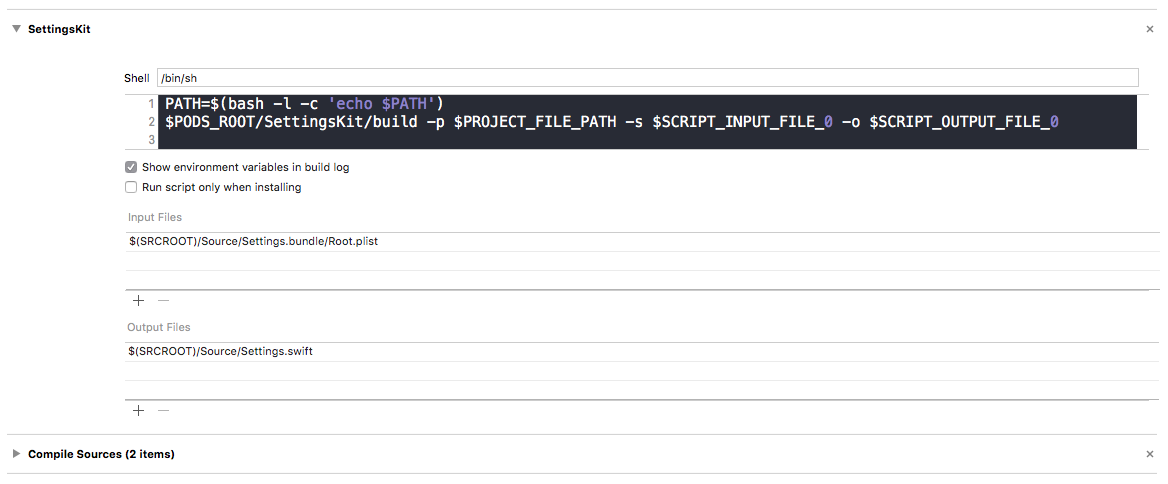
Step 1: Copy/paste the following into the script box:
PATH=$(bash -l -c 'echo $PATH')
$PODS_ROOT/SettingsKit/build -p $PROJECT_FILE_PATH -s $SCRIPT_INPUT_FILE_0 -o $SCRIPT_OUTPUT_FILE_0
Step 2: Add the path to your Settings.bundle/Root.plist to Input Files
.
Example:
Step 3: Add the path to where you would like the generated Settings.swift
file to be live (i.e. where you put your app’s source files).
Example:
When you are done with all of the above steps, your SettingsKit run script
phase should look something like this:

Finally, build (⌘B) your project. If the project builds successfully, you should
now see a new Settings.swift file in your project. Feel free to move it to any
group in your project.
From now on, everytime you build, SettingsKit will update the Settings.swift
file to match the Preference Items you have configured in your
Settings.bundle/Root.plist. You should never need to manually edit Settings.swift.
Author
Dan Trenz (@dtrenz) c/o Detroit Labs
License
SettingsKit is available under the Apache License, Version 2.0. See the LICENSE file for more info.
 View on GitHub
 SettingsKit Reference


